


Aged To Perfection
Tut By Ann Smith
Kit PTU by Tonya ~AKA~ Broken Sky Dezine
U can visit her site here http://brokenskydezine.blogspot.com
U can purchase the kit here at Taggers Delight http://taggersdelight.com/store/
artist I'm using is
©Jose Cano - canoart.net get his art here at PTE
My Supplies
animated smoke supplied
scrap kit I'm using u must purchase from above
artist I'm using purchase above
Font I'm using is Citrus
smoke rapid share download
smoke 4 shared download
Non Animated
animated

Aged To Perfection
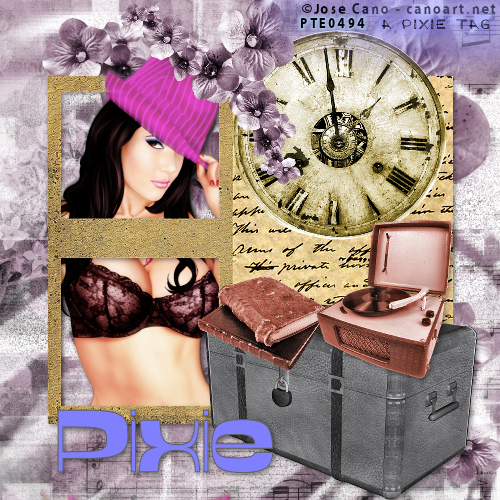
Open a new raster 500 x 500
copy and paste paper 5 from the kit
open a mask of your choice I'm using a grunge mask
smggrungemask3
apply it then merge group
on your raster 1 add white
go back to your top layer
open element 20
copy paste as a new layer
image re size 81 percent
add this drop shadow
V-2
H-2
O-40
Blur-7.00
color- black
hide your bottom layers by x out the eye
under your frame layer
copy and paste your artist of your choice place it where it looks good in side it
now take your eraser tool erase abound your frame erase all excess tube away
then use this drop shadow
V-2
H-2
O-40
Blur-7.00
color- black
then duplicate your tube
on the original tube add this drop shadow
V-2
H-2
O-40
Blur-7.00
color- black
on duplicate layer
adjust
Motion blur
with these settings
S-1100
change blend mode on this layer
Soft light
layers merge down
now we will use the following elements
BSD13
BSD39
BSD2
BSD3
BSD40
click under your original tube layer
we will add the purple flowers place it right above the mask layer
re arrange it to your liking
add this drop shadow
V-2
H-2
O-40
Blur-7.00
color- black
click back up to the top above the frame layer
paste as a new layer the clock
image re size 43 percent
place where u want it
use this drop shadow
V-2
H-2
O-40
Blur-7.00
color- black
now copy and paste your trunk element
image re size 59 percent
place where u want it
use this drop shadow
V-2
H-2
O-40
Blur-7.00
color -black
now add the books to the left side set it on the trunk
image re size 40 percent
use this drop shadow
V-2
H-2
O-40
Blur-7.00
color -black
now add the record player
place it on the trunk
image re size 59 times 2 (twice)
use this drop shadow
V-2
H-2
O-40
Blur-7.00
color -black
we will add the purple flowers again to the right corner of the frame
re size by 39 percent
re arrange it to your liking
add this drop shadow
V-2
H-2
O-40
Blur-7.00
color- black
add your copyright info - license number- your water mark
add the name u want
your done
if u want to animate it then follow this
Animate
move it from paint shop to animation shop
edit copy merged
go to animation shop
edit paste as a new animation
duplicate your tube so u have 5 frames
to do this
edit duplicate selected repeat this tell u have 5 frames
open your smoke i provided
it has 5 layers already
on your smoke layer go to edit select all copy
now go to your tag edit select all paste into selected frame place it where u want
I placed mine over the record player
U are done ty for trying my tut
plz do not reproduce the tut or re write it where its like mine
This tut was written by ann smith on 5/31/2012

