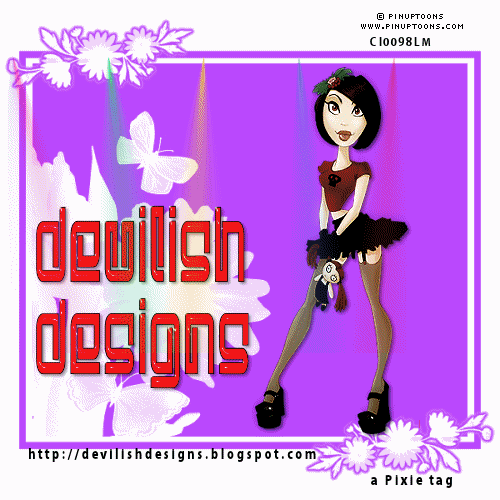
In this tutorial, we'll make a really basic tag using a picture tube that came with your PSP. I'll try to lead you through step-by step, but if you have any question, feel free to post them on the general board. Be sure to refer to the "Opening your PSP" in the tips and tricks section as we go. Have fun!!
1. Open your PSP, click on file, new, width and height both at 400 pixels, raster background checked, 16 million colors for color depth and a transparent background. Click ok.
2. Now, click on your picture tube tool. Got o the top and you'll see a box where you can view your picture tubes. Look through these and choose one you'd like to work with. Click on the picture you'd like to use, then place your cursor in the middle of your canvas, and click. You can change the size of your picture by clicking on "scale"and putting a percentage in - less than 100% for a smaller picture and more than 100% to make it larger, before you place your picture on your canvas
3. Now, we're going to make a really simple background for your tag. First, we're going to right click on "raster 1" on your layer palette, go up the list and click on duplicate. Then, X out the copy you just made, and highlight the raster 1 layer. By highlighting, you've selected that layer to work on.
Now, look to the top of your screen and you'll see where it says "effects". Click on it, then on texture effects and then on "mosaic antique". Put in the same settings as I have for this effect. If you want to play with other settings, that's great!! If you try one and don't like it, just hit ctrl-z and it will undo it.
Number of columns 85, Number of rows 77, Tile Diffusion 68
Grout width 1, Grout Diffusion 100
4. Now, we're going to un-x our original tube so we can see it again. Then, select your top layer, click on the "move tool" (right above the crop tool) and move the top layer slightly - I moved mine down and to the right. You can decide where you think yours looks best.
5. Just a couple of small things left to do before we finish this part. The first, is we're going to lighten our background a bit. To do this, move the slider by the layer on your layer palette, from 100% to 75%. Finally, we're going to add a drop shadow to our original picture, by clicking on effects, 3D effects, and drop shadow. The settings I've used are vertical 4, horizontal -6, opacity 64, blur 2, and color black. To choose your color, click on the colored square and with the dropper, click on the black square. Click ok.
6. Now to finish this part, we're going to merge our layers, so all the parts of our picture are on the same layer. To do this, go to layers, merge, and visible. Now, save this as a file name which you'll remember, as a psp file.
I've covered a lot of material in this tutorial and hopefully it's not too confusing. It's important to play with the settings and find ones you like. You may see other tutorials which do some things slightly differently - everyone has their own way and you'll find yours as you learn the program.
In my next tutorial, we'll put our name on your tag , and then we'll make it sparkle in a third tutorial.
Please do not claim my tutorials as your own. You are welcome to link to my tutorials, or print them out for your own use.But please do not copy them to your website, or take credit for them.
This tutorial was written by Ann. If there is any resemblance to any other tutorials, it's coincidental. Please do not claim this Tutorial as your own. Thank you.
Try My Tutorials,Templates, Word art,scrap kits, Tag backs, Photography, renders
TaggersDelightDesigners
TaggersDelight
Devilish Designs

Devilish Designs
Creationzbysharon

I am writing tuts for her scrapkits
The Creative Chicks

The Creative Chicks Forum
Thursday, January 13, 2011
Beginner Tag Tut, Step 2 ... Adding Your Name
Okay, the hard part is done!! The tag is made.
Now, we're going to add our name to it. So, here we go!!
Be sure to save your work often, so you don't lose what you have done.
1. Open the tag you made from the tut # 1 in PSP.
2. Now we'll choose the colors we want our text to be in - both an outline color and the color we want the text to be. First we're going to click on our dropper tool, and we should now have as our cursor something that looks like an eye dropper. Now run that over your tag and choose the color you want your text to be. When you have a color you like, right click on your mouse. Your color should now show in the bottom square on your materials palette. Now, do the same for the color you want your outline to be, but left click on your mouse this time. This color will show in the top box of your materials palette.
3. Choosing the font is the next step. Click on the "A" on the tools palette - the text tool. Then look at the top of your screen and you'll see where you can choose your font. Scroll down through the list and choose one you'd like to try. Set the size at 48 and stroke at 2. Left of where you choose your font, you'll see "create as" - be sure vector is chosen. Place your cursor on your tag where you want your name to be and click. A text box will appear, and this is where you type your name. When you have your name typed and are happy with it, click apply.
3. You should have a box around your name and in the middle is a circle. Place your cursor over this, and your move tool should show up. Move your text where you want it. Now, in your layers palette, right click on "vector 1" and click on "convert to raster layer".
4. Now we're going to add an inner bevel to our name, so it doesn't look flat. Click on "effects", "3D effects", and then "inner bevel". The settings I used are
Bevel #2 Smoothness 83 Color White
Width 4 Depth 2 Angle 315
Ambience 0 Intensity 34
Shininess 56 Elevation 36
Again , play with the settings to find one you like, If you try one and don't like it, press ctrl-z to back up a step and try another one.
5. Now we'll add a drop shadow, like we did making our tag. Go to effects, 3D effects and drop shadow. The settings I use are
Vertical 2
Horizontal -4
Opacity 64
Blur 0
Color Black.
6. Now we just have to merge our two layers. To do that, click on layers, merge, and visible. Now save this as a PSP file with a different name ... maybe tag with name, or tag 2. It doesn't matter as long as you can find it for the final step in our tag - adding animation.
If you have any questions, please post them on to general board and one of our many talented taggers will be pleased to help.
Please do not claim my tutorials as your own. You are welcome to link to my tutorials, or print them out for your own use.But please do not copy them to your website, or take credit for them.
This tutorial was written by Ann. If there is any resemblance to any other tutorials, it's coincidental. Please do not claim this Tutorial as your own. Thank you.
Making the tag sparkle Tut 3
Now for the really fun part!! Making the tag sparkle.
The sparkle we're going to do in this tutorial is using the "add noise" option that comes with your PSP. There are lots of different ways to do this as you learn more about making tags. To do this, though, you must have animation shop.
1. First, if you want to cut away some of the background, we'll do that. If you're okay with your background, you can skip this step. To crop your background, click on the crop tool. Then select the area of the tag you want to keep by scrolling over your tag with your mouse. Once you have your area you want to keep chosen, go to the top of the screen and you'll see a blue check mark to the left, just click on it. Now your tag should be cropped.
2. Now on to the animation!! First, right click on your layer and click on duplicate twice, so you have 3 layers. X out your top 2 layers by clicking on the eye next to the layers. Now click on the bottom layer so it's selected to work on.
3. Go to "adjust", "add/remove noise", and "add noise". Click on "gaussian" and I used a setting of 10 and I have monochrome checked. Click ok. Now, click on the eye of your middle layer so you can see it again, select that layer to work on, and use the same settings except increase the amount of noise to 15. Now do the same for your third layer, increasing the noise setting to 18.
4. Now, save your tag as an animation shop file, very near the top of your list of file types (in PSP9). Then, open animation shop and open your file that has the noise. When you do this, you should see all three layers of your tag. Now, click on "view" and then "animation". You should see your tag sparkling!!
5. If you want to change the speed of your animation, click on "animation", "frame properties" and select another number. The smaller the number, the faster the animation will be.
6. To save your tag, view the animation, click on "file", "save as" and save your animated tag as a .giff file.
And your done!! You've made your first animated tag. Congratulations!!
Again, if you have any questions, feel free to post them on the general board and someone will help you!!
Please do not claim my tutorials as your own. You are welcome to link to my tutorials, or print them out for your own use.But please do not copy them to your website, or take credit for them.
©Ann
Optimation Settings'
"Optimation Settings"
Hello everyone,
I realize that when we are saving graphics in Animation Shop, we sometimes get a real fuzzy background on our graphics, even maybe black backgrounds...
Well, that can happen when you have a drop shadow on your graphics most of the time.. Or other times as well. So this Tutorial is going to show you how to fix that problem.
First thing we need to do is open AS(Animation Shop)
Open a new canvas, size doe not matter.
Take the line tool, and just put a line on the canvas anywhere, we are doing this just to be able to get the optimization active.
Go to File, Optimization Wizard, now use the following settings:
Page one: Optimize for Animated GIF file. Put a check next to Create A New Animation from Optimized Animation, click Next.
Click the customize button,
Colors Tab
Number of colors 255, Optimized Median Cut, and error difussion.
Click the Optimizations Tab
Remove NonVisable Animation Elements. Collapse Identical Frames, Map Identical Pixels.
Partial Transparencey Tab
Convert poxels less then 40, Yes blend with (make sure to check this box) White
Or if you are doing a colored background go in and change this to your background color. Mostly you will leave it as white though.
Hit OKAY and keep hitting next until you hit the end
Okay now your settings are set for the best looking results
Note: Periodically you will have to reset your optimization in Animation Shop~ I'm not sure why the optimizations change but they do so keep this tip handy. I have to reset mine every few weeks for some reason.
©Ann
'Adding Text to Animation'
"Adding Text to Animation"
If you'd like to link to this tutorial, or print for your own use. Please feel free to do so. This tutorial was written using PSP 9. This will also work for 8, 9, 10, and 11 and 12
would you like to add a text to your animation? If so, this is the place to learn how to do that. In this tutorial we're going to be using an Animated Image that you have.
Let's get started
We need to open up PSP. Please open a new transparent image, let's make it 400X400. We'll crop it down later.
Select the "A" icon, now click on your New Image, select a font of your liking, the size you prefer as long as it's no bigger than 72, and of course the color you'd think would look best with your Image, it is entirely up to you. Now once you have applied your text, we're going to crop the image. Click your crop tool, 4th tool on your toolbar. Now click on your image, and drag your mouse across the image, by left clicking it, make a rectangle square around your text, left click twice. Hooray, you've cropped your image! Now right click, and click cut, don't worry it disappears so don't go panicing on me here!
Now it's time to open your AS which is short for Animation shop. Right click and click Paste as a new animation, or click ctrl+v. Now you need to open the animated Image. You will see the Image has frames on the bottom of the image it will show you. Ok, we need to give our text the same ammount of frames as the image, well so that it will match up with the frames on the image and so it will appear correctly.
So let's give it however many frames your image has. What you need to do is left click on your image, then right click, click duplicate selected, and left click once again, and right click, click duplicate select, keep doing this step until your text has the correct ammount of frames. If you go over don't worry, just click on the extra one, right click select cut, it will go away. Now that it has the right ammount of frames, we need to add it to Your image..We need to click the text image, click ctrl+a this will select all of the frames, right click, click copy, and now we need to go to your image, and once again click ctrl+A to select all of the Animated Image frames, now you need to go up to the top of AS. You'll see a pair of scissors, we need to click the button on the opposite side of scissors, it will be the 6th button from the left, that is Paste into selected frame, if you're not sure you're click the right one, hold your mouse over it for a second, it will tell you. Now once you do this, you're text will appear on the Animted Image, you need to move it where you'd like it to stay, and left click.
Now your text should be on your animation.
All you have to do now is click view, and click animation, and watch!
Congratulations!! Hope you have enjoyed this tutorial as much as I have writing it.
This Tutorial was Written out by me, Ann. If there is any resemblance to any other tutorials, it's coincidental..Please do not claim this Tutorial as your own..Thank you.
©Ann
'Adding Sparkles to a Graphic using Visman'
"Adding Sparkles to a Graphic using Visman"
If you'd like to link to this tutorial, or print for your own use. Please feel free to do so. This tutorial was written using PSP 9. This will also work for 8, 9, 10 and 11 and 12
. Everyone should know how to add some sparkles to a graphic. If you have not completed the tutorial I recently wrote on installing plugins and filters. You must do that, before you can complete this tutorial. If you already have them installed, great! So let's get started!
Ok, You need to Open your Image in PSP, Now, to add sparkles using Visman, we must give this Image 3 layers. Don't panic! It's easy. In your PSP, look above you'll see "Layers" click that, click duplicate, and then click "Layers" and then click duplicate one more time. Now your graphic has 3 layers.
Now, we need to open your layer pallette. Now click the bottom layer, Now once that is highlighted, go to effects, and go down to your plug in filters, choose VM natural, choose Sparkle. Now you need to change your Random Seed settings too 70 and your max size to 50. Click ok. Then go back to your layer palette highlight the middle layer Copy. Go to effects, plug-in filters, VM Natural, Sparkle, this time your settings need to be Random seed 80, max size 60, click ok! Now, once more go to your layer palette highlight copy of copy of your Image. Go to effects, Plug-in filters, VM Natural, Sparkle. Random seed 90, max size 70. Click ok.
A little tip, always remember it's best to have at least for example if your one layer has random seed 70, it's always best on the next layers to maybe have 10 less or 10 more, or something. shouldn't all be the same..That is for example. Same with your Max size. So each layer should have a diffrent setting. You also have color settings too, you can always fiddle around with the settings until you find the setting you like, Now, let's save our graphic as PSP image in our file.
Open it up in AS(Animation Shop) click veiw, and animation. Watch it sparkle...
Congratulations, you're done!!
Thank you for using my tutorial.
This Tutorial was Written out by me, ann. If there is any resemblance to any other tutorials, it's coincidental..Please do not claim this Tutorial as your own..Thank you.
©Ann
Installing Visman Filters and Plugins'
"Installing Visman Filters and Plugins"
If you'd like to link to this tutorial, or print for your own use. Please feel free to do so. This tutorial was written using PSP 9. This will also work for 8, 9, 10 and 11.12. Although Installing them into PSP will differ depending on which version you use.
...
In this tutorial, we're going to be installing Plugins, and the Visman Filter. The visman filter is a great filter for PSP. You can add sparkles, and so much more...
Ok, first of all we need to install the plugins to your System folder, you need to download, unzip them and send them to your system folder, so we will do that now.. Click here MSVCRT10.DLL download When this is downloaded and unziped, put it in your system folder. Click here to download the next plugin>PLUGIN.DLL
Once that is done.. you need to go to"My Computer" and make a new folder, I call mine Plugins and Filters. Name yours what you'd like to, as long as you remember what the file is for, and remember the name of it.
Ok, now that that's done, we're going to move on and install the Visman Filter. Click the link>Vismanto download Visman, Visman is on the list, toward the bottom right under V, click it, download, unzip, and put it in your Plugins and Filters folder.
Now, we need to open PSP. Click File, file locations, preferences, and file Locations. Look for the Plug-in filters tab, click it. You'll see Folder 1, folder 2, folder 3. On folder 2, click browse, browse for the Filter file you made a bit earlier in this tutorial , when you find it, click it, and click ok. It should be in the folder 2 white line now. The 4 square boxes above the 3 white lines. the 1st one should be checked, and the last 2 should be checked. Uncheck the 2nd square. When you have finished, click OK. and now your plug in folder is attached to your PSP.
Now, open up any graphic in PSP. Click on Effects, and you should see Plug in filters, at the very bottom..
Congratulations, you're done with this Tutorial! Thank you for your patience, and if you have had any trouble at all, please contact me Ann congratulations! and hope you enjoyed the tutorial!
This Tutorial was Written out by me, Ann. If there is any resemblance to any other tutorials, it's coincidental..Please do not claim this Tutorial as your own..Thank you.
©Ann
'Making our text Glitter'
If you'd like to link to this tutorial, or print for your own use. Please feel free to do so. This tutorial was written using PSP 9. This will also work for 8, 9, 10 and 11 and 12
Ok, here we are, now we're going to learn how to make our text glitter in this Tutorial, this is not hard, it's easy and fun! Let's go!
Ok,in PSP now we need to open the 3 glitter files that you seperated in AS. Open each one, one at a time. Blue1. Blue2. and Blue3.
Now we need to open a new image, let's make it 400x400 pixels. If we need to crop it down some, we can do that, but not until later in this tutorial.
Click the A icon, choose a font of your liking, and a size. It is completely up to you what font and size you'd like to work with. Make sure floating and Antilias is checked.Also make sure you're "Stroke and Fill" colors are white. Once you have applied your text, you'll see marching ants around it..Now you need to push Shift+D twice, this will duplicate this image twice, now go back to your original image. You need to click you're flood fill tool, it is right beside the A icon, on the left. Now you need to go to your "Material Palette" on the right of your PSP, you will see "Textures" you need to change that to Patterns, by clicking the little black arrow, patterns is the 3rd one once you do. You need to scroll up and you will see your 3 glitter frames. Click Blue1.(Or whatever you named your file) Then you need to go to your image, right click, now you will see your text with the glitter in it. Now you need to go to Selections on your tool bar, select none, and go to save your image, as Glitter1
Now, you should have two more images, with your text, you need to click on another image, click flood fill, go to "Patterns" find your file "Blue2" and right click your text, you should see your glitter in your text, selections, select none, save as Glitter2. Repeat this steps with the last text image, only changing your pattern file from blue 2, to blue 3. save as Glitter3
Congratulations, we're about done..
Now we need to go into Animation shop, we need to click on file, and then Animation wizard. We need to make sure Same size as the first image is checked, second page transparent, third page, upper left corner of frame, and with the canvas color. Fourth Page, Yes repeat the animation indefinitely, speed set to 10. On the fifth page, it is now time to click on Add Image, and find the 3 frames you did, start with Glitter1. make sure all of 3 images are loaded in the correct order, then click finish.
Now, you will see your text in 3 frames. now, you can go up to veiw, and then click animation, and see your glitter text animate.
If you'd like to crop it down, and get all of that extra background around it off of there. First you need to go to your image, and push CTRL+A this will select all of your images so you can crop them. Go to your crop tool, 4th tool on tool bar in AS. Now go to your first image, drag your mouse, until a rectangular square is around your text, click twice, and your image is now cropped.
Go up to veiw, click animation. And watch your Text glitter!
Congratulations, you have now made your text glitter. I hope this tutorial was easy for you.
This Tutorial was Written out by me, Ann If there is any resemblance to any other tutorials, it's coincidental..Please do not claim this Tutorial as your own..Thank you.
©Ann
'Separating Glitter'
"Separating Glitter"
If you'd like to link to this tutorial, or print for your own use. Please feel free to do so. This tutorial was written using PSP 9. This will also work 8, 9, 10 and 11 and 12
Hello everyone, in this Tutorial, we're going to learn how to separate our glitter frames, so we can make our text glitter like we want it too!
Ok, now I am going to ask you to open Animation shop (AS). Open a glitter file that you've saved in AS. You will see that it has 3 frames.
On the first glitter frame, click it, until it is highlighted in red, then go up above, click file, go down to Export, then click on "to Paint Shop Pro" PSP will open, you will see that glitter frame there, above click on file, and save as. Name the file Blue1.
**For all of you who use PSP 8, when you click SAVE AS a little box will come up, you need to click Options, another little box will appear, you will see it says "Save Options" You need to make sure under "Compression" LZ77 Compression has a check by it, and down where you see "Versions" You need to save as PSP 7 Compatable. Click Ok. These settings will stay this way, you do not have to go back and do this over again once they're set. THIS IS ONLY FOR PSP 8 users.
Now once you have saved your first frame as Blue1. repeat the steps in AS with the next two frames. Click the 2nd glitter frame, go to file, export to PAINT SHOP PRO. In psp save as Blue2. Repeat this same step for the 3rd and last frame.
Congratulations, you have separated your glitter frames..
Now follow me to the next tutorial, where you will learn how to make your text glitter.
This Tutorial was Written out by me, ann. If there is any resemblance to any other tutorials, it's coincidental..Please do not claim this Tutorial as your own..Thank you
©Ann
Creating a watermark'
Creating a watermark"
If you'd like to link to this tutorial, or print for your own use. Please feel free to do so. This tutorial was written using PSP 9. This will also work for 8, 9, 10 and 11.. and 12
First of all, open a new image in PSP, 400x400 pixels.
Now you will need to click on the text tool option, the "A" icon. You're welcome to choose any font you'd like to use for your watermark, the size will depend on the font. I usually use 22 or 24, it works best to me. Set the stroke to null, and fill to white. Antialias and floating both checked.
When you've applied your text, you will see Marching ants around your text. Click on your layer palette, make sure that you see "Floating Section" highlighted, you need to right click, and click delete layer. Now your marching ants will be in the form of your text.
Up above click on effects, then you need to find 3D effects, drop shadow. Make sure you have these settings:
Vertical offset: 2, Horizontal offset: 2, Opacity: 50, Blur: 3.5, Color: Black.
Apply that drop shadow, then you need to repeat the steps, effects, 3D effects, drop shadow, this time making a couple of changes.
Vertical offset: -2, Horizontal offset: 2. This is the only changed that you need to make, remember. Apply that drop shadow.. We're about done!
Now you need to go back to your image, go to Selections, select none, remove the marching ants.
If you'd like to crop your watermark, you can do that. You might not need to, using 400x400 pixels, but it is your choice, on how much room you want around the watermark. To crop your watermark, click on your crop tool in PSP, it is the 4th tool on the tool bar. Then go to your image, drag your mouse, until you have a rectangular square around your watermark, click twice. You've cropped your image.
Now all you have to do is save your watermark image. When you'd like to add your watermark to your tags, click open, find your watermark, in the file you've saved it in, and apply!
Congratulations, hope you've enjoyed this tutorial, and it was helpful to you.
This Tutorial was Written out by me, ann. If there is any resemblance to any other tutorials, it's coincidental..Please do not claim this Tutorial as your own..Thank you.
©Ann
'Adding Glitter text to Graphic'
If you'd like to link to this tutorial, or print for your own use. Please feel free to do so. This tutorial was written using PSP 9. This will also work for 8, 9, 10 and 11.. and 12...
This one is really easy and fun, and will not take no time! I suggest you learn how to Separate Glitter, and make a glitter text before trying this tut, otherwise you have no glitter text to add to a Image!
Ok, we're going to a Imagethat you'd like to use that you have..
Ok, we're going to open it up in Animation Shop, as well as our Glitter Text.
Ok, once we have our Image and Glitter text open in AS, we need to check and see how many frames our glitter text has..The usual is 3, but if you've used one that has more than that, just count them and make sure how many..
Now, how ever many frames your glitter text has, we need to give our Image that many as well, to do that you need to left click on the Image, right click, click duplicate, and do that step until your Image has as many frames are your glitter text. If you make one frame to many, don't worry, just left click on the frame you need to delete and right click and hit delete.
Now that our Image has as many frames as our glitter text, we need to go to our glitter text, left click on the first image, push ctrl+A together, this will select all glitter text frames, we then need to right click, click copy. Now we go over to our Image, we need to left click the first Image frame, push Ctrl+A together, this will select all Image frames. Now, right click the Image, click paste, and 4 options will drop down, you need to click "Into Selected Frame" Now your glitter text will be in your Image, place it where you want it, and you're done!
If you need to crop your image, click the crop tool, 4th tool on the tool bar, click that, and draw a rectangel around your Image, and left click twice, and your image will be cropped.
CONGRATULATIONS! You've just completed this tutorial! Great job!
I hope you've enjoyed this tutorial, as much as I have enjoyed writing it!
This Tutorial was Written out by me, Ann. If there is any resemblance to any other tutorials, it's coincidental..Please do not claim this Tutorial as your own
©Ann
Subscribe to:
Posts (Atom)